Frequently Asked Question
How to AutoFit in Excel
Last Updated 4 years ago
How to AutoFit in Excel
What I particularly like about Excel is that it provides more than one way to do most things. Depending on your preferred work style, you can auto fit columns and rows by using the mouse, ribbon or keyboard.AutoFit columns and rows with a double-click
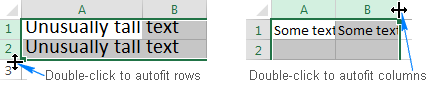
The easiest way to auto fit in Excel is by double-clicking the column or row border:- To autofit one column, position the mouse pointer over the right border of the column heading until the double-headed arrow appears, and then double click the border.
- To autofit one row, hover the mouse pointer over the lower boundary of the row heading, and double click the border.
- To autofit multiple columns / multiple rows, select them, and double click a boundary between any two column / row headings in the selection.
- To autofit the whole sheet, press Ctrl + A or click the Select All button
 and then, depending on your needs, double click a border of any column or row heading, or both.
AutoFit columns and rows by using the ribbon
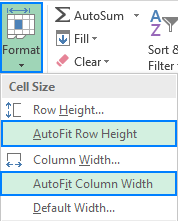
Another way to AutoFit in Excel is by using the following options on the ribbon:To AutoFit column width, select one, several or all columns on the sheet, go to the Home tab > Cells group, and click Format > AutoFit Column Width.
To AutoFit row height, select the row(s) of interest, go to the Home tab > Cells group, and click Format > AutoFit Row Height.
AutoFit column width and row height using a keyboard shortcut
Those of you who prefer working with the keyboard most of the time, may like the following way to auto fit in Excel:- Select any cell in the column/row you want to autofit:
- To autofit multiple non-adjacent columns/rows, select one column or row and hold down the Ctrl key while selecting the other columns or rows.
- To autofit the entire sheet, press Ctrl + A or click the Select All button.
- Press one of the following keyboard shortcuts:
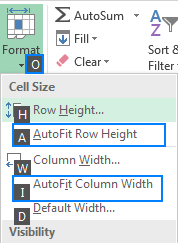
- To AutoFit column width: Alt + H, then O, and then I
- To AutoFit row height: Alt + H, then O, and then A
- Alt + H selects the Home tab on the ribbon.
- O opens the Format menu.
- I selects the AutoFit Column Width option.
- A selects the AutoFit Row Height option.
Excel AutoFit not working
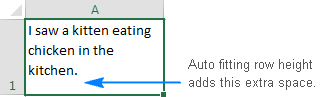
In most situations, the Excel AutoFit feature works without a hitch. There are times, however, when it fails to auto size columns or rows, especially when the Wrap Text feature is enabled.Here's a typical scenario: you set the desired column width, turn Text Wrap on, select the cells of interest, and double click a row separator to autofit the row height. In most cases, rows are sized properly. But sometimes (and this may happen in any version of Excel 2007 to Excel 2016), some extra space appears below the last line of text as show in the screenshot below. Moreover, the text may look correctly on the screen, but gets cut off when printed.
By trial and error, the following solution for the above problem has been found. At first sight, it may seem illogical, but it does work :)
- Press Ctrl + A to select the whole worksheet.
- Make any column a fair amount wider by dragging the right boundary of the column heading (because the entire sheet is selected, all the columns will be resized).
- Double-click any row separator to auto fit the row height.
- Double-click any column separator to auto fit the column widths.
Alternatives to AutoFit in Excel
The Excel AutoFit feature is a real time saver when it comes to adjusting the size of your columns and rows to match the size of your content. However, it's not an option when working with large text strings that are tens or hundreds of characters long. In this case, a better solution would be wrapping text so that it displays on multiple lines rather than on one long line.Another possible way to accommodate long text is to merge several cells into one big cell. To do this, select two or more adjacent cells and click Merge & Center on the Home tab, in the Alignment group.
This is how you use the AutoFit feature in Excel to increase cell size and make your data easier to read. I thank you for reading and hope to see you on our blog next week!